
Workspace Overview
The following sections describe how to create and manage projects:
n Working with DataGrid Tables
n Changing Multiple Rows Contents
n Intellisense and Refactoring
n Dictionaries and Localization
n Projects Import and Exports.
The application TManager.exe provides access to edit your project configuration in Action.NET. The user interface is similar to a web browser, with a back button, list of recent items, and other navigation tools. Figure bellow shows the main parts of the page.
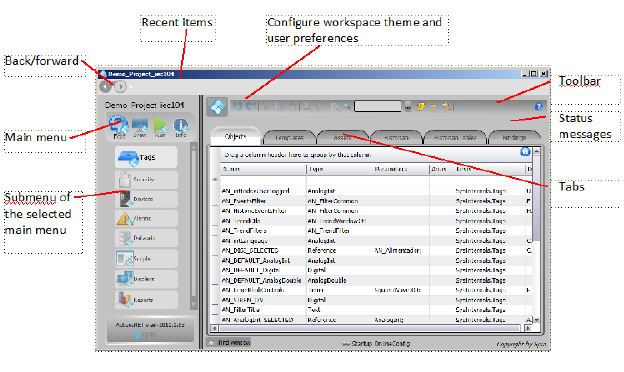
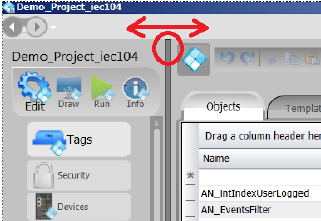
You can drag the vertical bar with the mouse to adjust the size of the left menu frame, when you want to have more space on the workspace area
The toolbar at the top of every page has all of the common toolbar buttons, such as undo, redo, cut, copy, and paste, as well as buttons for common functions that are unique to Action.NET.

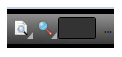
In addition, some buttons have additional options when you right-click them. For example, the Print and Find buttons have these additional options, as shown in Figure 1.

Figure 1: Toolbar right-click options
n The print options let you either print or save to a .csv file.
n The find options let you find, go to previous, and go to next. For more information, see Working with DataGrid Tables.
The Undo and Redo buttons on the toolbar let you undo or redo any operation. When editing tables, undo and redo are available for all changes during your editing session.
When editing documents (in the Draw, Reports, and Scripts areas), undo and redo are available until you save changes.
The Cut, Copy and Paste buttons are context sensitive, when the focus is on a DataGrid they will cut/copy and paste the selected rows. When the focus is on the drawing tool, they will act on the selected objects.
The reason for the word “Smart” is that you can copy and paste rows to and from Excel, as well from other tables in the workspace, even if the columns are not all the same. When copying and pasting, the Columns Titles are also copied to the clipboard, so the system is able to put the information on the right column, no matter the order you are displaying the columns, or if some columns does not have on the target table.

When copying from Excel make sure to select the Row Titles. You can also copy Rows from the Tags tables to the Historian directly to enable data logging of those tags.
Print, Save to a File or Import
 These commands allow you to print the selected document (either a DataGrid or a Drawing). The export button will save DataGrids to a CSV file and graphical displays to JPG files. The import button will import CSV files to the DataGrid.
You may want to find where you have used a specific object, such as a tag, in a project. The Engineering workspace provides three ways to search.
 Find String button and Find Object Buttons
n The Find String button is to search for a specific string in the current tab of the current Data Grid table. Type the string you want to search in the TextBox and press the FindString button.
n The Find Object button on the toolbar accesses the Object Cross-Reference, which lets you find where objects are used int the Project and go directly to each location. For more information on Cross-Reference, see
 Finally you can apply dynamic filters on the selected table, just by typing the mask on input field. Example: *abc* will filter to show only the rows with the letters “abc” in any position of the name; ab* will filter to show the rows starting with “ab”. Click on the Home button to clear all the filters and reset all the DataGrid columns viewing state to the system default.

New Tag: allows to create a new tag in the real-time database.
Tag Properties: Shows the properties of the Tag Selected at the TextBox
 The tooltip shows the currently logged-in user and when you click it opens the Logon Dialog. By default, when the system starts, the Guest user is logged in. The permissions of each user are defined at Security and Users
 The Help button navigates the workspace to the section Info-Help, which provides access to the local help file as well to do searches on the online content.
You navigate in Action.NET using the workspace environment, sections and tabs.
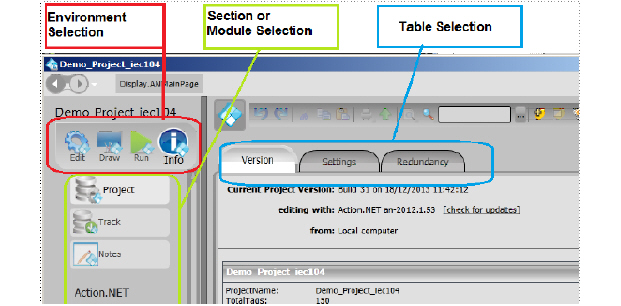
Any Engineering workspace user interface is, therefore, identified by 3 names: the Environment (main menu on top left), the Section (or sub-menu) and the Tab (or Table)
To describe how to get to a specific location where you perform functions, we use a shorthand notation.
For example, rather than saying:
Click Edit, then click Tags, then click the Objects tab.
We say:
Go to Edit > Tags > Objects.
This shorthand notation quickly tells you how to navigate to the correct main menu, sections, and tabs.
 To configure the basic elements of your project, from the Main Menu, click on the “Edit” icon.
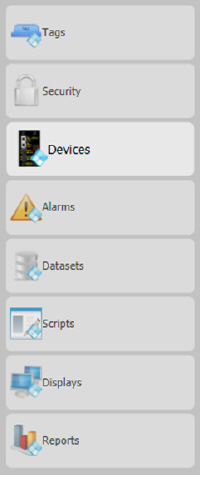
Define/Edit Tags to use in the project.
Define User permissions and Project access levels.
Configure Communication Protocols and Device Data Acquisition.
Configure Alarm Tags and Alarm Groups to generate Alarms under defined conditions.
Define data sources such as Files, Databases, Specific Tables, Pre-defined queries.
Configure .NET Scripts in VB.NET or C-Sharp.
Select dynamic graphical displays to configure.
Configure Reports, which including updated graphical symbols, in XPS, PDF, HTML, ASCII, and Unicode formats.
 To configure dynamic displays, select the Display on Edit-Displays and click on the Draw icon to access the graphical Designer.
 The Run environment provides access to all project execution commands
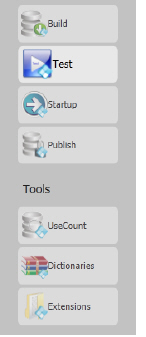
Prepare a Project for execution and save the project's Build history.
Testing the project provides a way to see the project in action before publishing it to the server for use.
Run the project configuration in production mode.
Publish the Project to enable its final installation. Increment the project Publish Revision numbers.
Tallies the number of times Tags are used in the project. Provides project objects cross reference.
Customize your project to use other languages in Alarm Messages and Display text.
Import configuration data already created for OPC Servers, any configuration table, or an entire project.
 Provide access to current Project information.
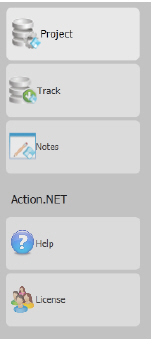
Project and product Version, location of project, Local Language, License information.
Find information regarding published project release number and project changes.
Leave arbitrary notes for other project engineers.
Access local and on-line help contents
License information and register
Many tabs in Action.NET display information in a table. All tables let you manipulate, copy, paste, and import data in the same way. The following sections describe how to use these functions:
n Sorting, Filtering, and Grouping
n Changing Multiple Rows Contents
Action.NET stores most configurations from the Edit menu, such as tags, alarms, users, in tables. In most tables, you can add and edit information the same way.
To add a new table item (row):
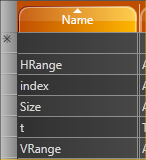
1. Click the first column of the insertion row.
n The insertion row is the first row of the table and has an * next to it.

n After you click a column in the row, the * becomes a pencil icon, showing that you are now editing that row.

2. Do one of the following in the column in which you clicked:
n If the column is a text field, enter the information.
n If the column is a selection field, click again, then select items from the drop-down list or pop-up window that displays.
3. Press Tab to move through the columns in the row.
To edit an existing table row:
1. Click the column in the row that you want to change.
2. Do one of the following in the column in which you clicked:
n If the column is a text field, enter the new information. The system overwrites the text that was in the field. To change part of the text, click again, then make changes.
n If the column is a selection field, click again, then select items from the drop-down list or pop-up window that displays.
More than one person can edit a project at the same time. The system saves all changes to the project server and propagates the changes to other users. If two users modify the same configuration table or document, the changes from the last person who saves would overwrite any previous changes.
Throughout Action.NET, fields and buttons have tool tips that contain information about the field or button. Some tooltips also include an example that can help you. The system also validates what you enter in most fields, especially in tables. If you see a red outline around the table cell, the entry is not valid.

Sorting, Filtering, and Grouping
Information in many tabs within Action.NET displays in tables that you can sort, filter, and group.
By default, items in table are listed in the order in which you created them.
To Filter By Name:
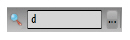
1. In most tables there is a text box at the top right labeled Filter by Name, to be used as a quick filter;
2. Just type the initial letters of the requested contents in the Name column;
3. Automatically, and as you type the filtering, the lines with names beginning with those letters appear.
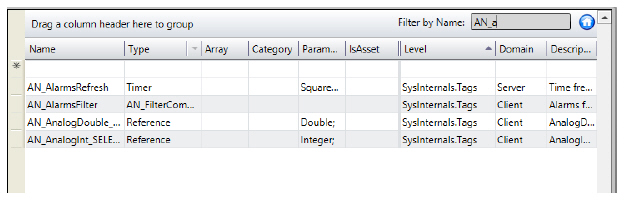
4. You can use the * before or after the letters you type to indicate that the filter accepts other letters before or after the letters you type.
To sort a table:
1. From any table, click the column heading you want to use to sort.
n The items now sort in ascending alphanumeric order based on that column.
2. Click the column heading again to sort in descending alphanumeric order.
3. Click the column heading again to return to the default order.
To filter a table:
1. From any table, hover over the column heading you want to use to filter.
n An arrow for a drop-down list displays next to the column heading.
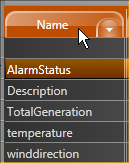
2. Click the arrow to see the list of items in the column.
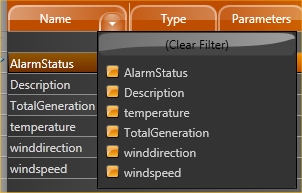
3. Select the items you want to include in the filter.
4. To remove the filter, click the drop-down list and click (Clear Filter).
To group items in a table:
1. From any table, drag a column heading to the area above the columns to group by that column.
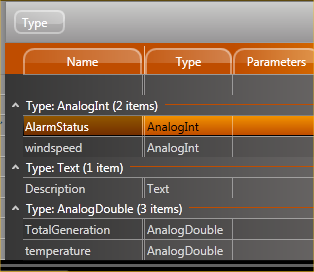
2. To remove the grouping, drag the column name back to the column headers area.
Tables in Action.NET display a default set of columns. Every table has additional columns that you can display, and you can remove any of the default columns.
You can also change the order of the columns. For the definitions of columns that are available in all tables, see Common Column Definitions.
To add or remove a column:
1. From any table, right-click in the column heading area.
n A list of all available columns for that table displays. Columns with a check mark next to them currently display in the table.
2. Select or deselect columns in the list.
3. Click outside the list to close it.
4. To change the order of the columns, drag a column heading to a new location.
5. To reset the columns to the default, click  Reset Grid to Default Settings.
Several common columns are available from many tables. These columns are defined below, rather than repeating them in the description of every applicable table.
|
Column |
Description |
|---|---|
|
ID |
Database ID assigned to the object in the table. Numbers are assigned starting from 1 for the first object created and continue as needed. The IDs are unique only to a specific table. |
|
Level |
Select the level you want to associate with the tag on the Assets tab. See Creating Assets. |
|
Category |
Select one or more categories for this attribute. See Categories Dictionary. |
|
DateModified |
Date the object was last changed. |
|
DateCreated |
Date the object was created. |
|
Description |
Enter a description of the object. |
You can copy and paste rows into and from tables in Action.NET. The copy/paste functions let you copy rows from one table to another within Action.NET. For example, you can copy tags and paste them into the Historian tab or the Items tab under Alarms.
You can also copy and paste to and from a spreadsheet.
To copy rows to another tab in Action.NET:
1. From any table, select one or more rows.
2. Right-click and select Copy Selected Rows.
3. Go to another tab in Action.NET.
4. Right-click and select Paste Rows.
To copy rows to a spreadsheet:
1. From any table, select one or more rows.
2. Right-click and select Copy Selected Rows.
n The copy automatically includes all available column headings for the tab you are in.
3. Go to a spreadsheet and paste.
To paste rows from a spreadsheet:
1. Set up the spreadsheet columns by following the copy steps above.
2. Enter the information you want.
3. Copy the information, including the headings, from the spreadsheet.
4. From the corresponding table, right-click and select Paste Rows.
n The paste automatically places the data into the corresponding columns. Any empty cells are ignored.
You can import a comma-separated values (.csv) file into any table. Column headings must match the table you are importing into. The best way to ensure that is to copy rows into a spreadsheet first, then edit the spreadsheet. For information about copying rows, see Copying and Pasting Rows.
To import data:
1. Create the data in a spreadsheet.
n If you are creating tags or other objects, you can name the objects as needed. If you are populating other columns, the data in the columns must match what Action.NET expects.
2. Save the file as a .csv.
3. From the corresponding table in Action.NET, click  Import from a CSV file.
4. Navigate to the .csv file and select it.
5. Click Open.
n The system imports the data into the table
Changing Multiple Rows Contents
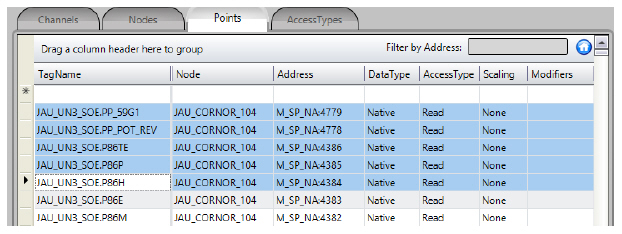
You often want to change the contents of one or more columns in a table, but you need to do this with multiple table rows. This facility is available in virtually every table in the engineering interface.
To change contents across multiple rows in a table:
1. Go to the table and multiple select the rows you want to change.
n Press and hold the Shift key, left-click on the first line and after the last line of the block on which you want the changes. The rows change color to show that they are selected.
n Alternatively, if you want to select multiple non-contiguous lines, hold down the Ctrl key, and then hold down the left mouse button on each line you want to make changes to. Clicked lines change color to show that they are selected.
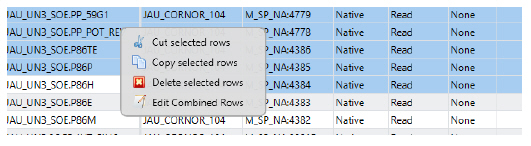
2. Once the selection has been made, right-click on the table. A sub menu will be displayed. In it select the option Edit Combined Rows.
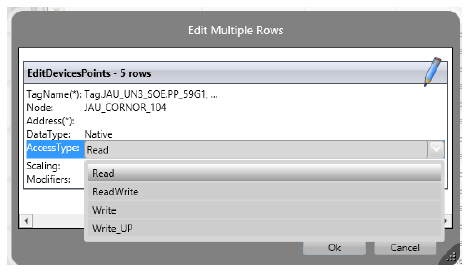
3. The following is a window with the columns of the table and the current and possible contents for each column. Then make the changes you want and then press the OK button.
Next figure shows a Multiple rows edition window.
You can view how many times each object in the project is used, as well as a list of objects that are not used.
To find objects:
1. Do one of the following:
n From the table that has an occurrence of the object you want to find, select the object. For example, select the tag you want to find elsewhere in the project.
n The Find field in the toolbar auto-populates with the name of the selected tag.
n In the Find field in the toolbar, enter the type of object (tag), followed by a . (period), followed by the name of the object (the tag name in this case).
n As you type in the field, the system matches the first entry to objects in the system. After the first ., it lists all objects of that type.
n Next to the Find field, click button shown below (...).The Select Object window displays with a list of all the object types.

n When you select an object type, the names of that type display.
2. Click Find or from the Select Object window, click OK.
n The results of the search display at the bottom of the page.
3. Double-click any row in the find results to go to that item.
4. To close the results pane, click Find window at the bottom of the page.
To track object use:
1. Go to Run > Tools > UseCount.
n To view objects that are not used, click the UnusedObjects tab.
All the input fields, either on the datagrids or at the drawing tools, where you can use tag names or object names, which are enabled through Intellisense.
The Intellisense feature presents a list of valid objects according the letters you are typing and the valid entries to that specific input field. You can insert the selected item in the list pressing enter, space, the dot key or other symbol keys.
The Intellisense fields also have built-in tooltips and validation. Putting the mouse over a field will present the expected entries to that field. When you have an invalid input, the border of the field will become red and the tooltip will show the error.
Refactoring is the procedure of changing the definition of Tag Names, or any other objects Names (such as alarm groups, device nodes and any other) after that symbolic name is already in use in the application.
Thanks to the centralized SQL configuration, Action.NET allows you to rename any object by simply typing the new name at the configuration table where that object is defined, all the references to that object will be valid, using the new name with no actions required.
For instance, to rename a tag that is already being used all across the project, just go to Edit-Tags-Objects and rename it. The same applies to Edit-Alarms-Groups, members at templates or any named object at the system.
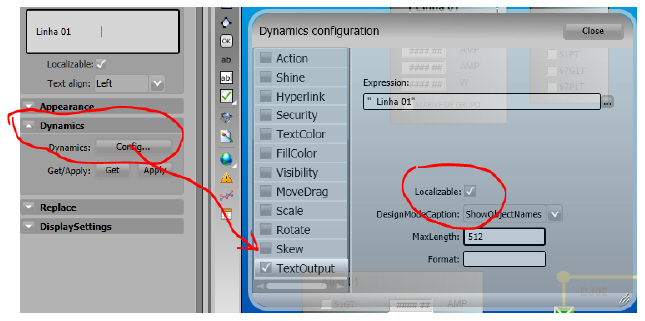
You can localize the text in your application in as many languages as needed. You create a dictionary for each language.

To localize user interface text, be sure to select the Localizable option (Dynamics Configuration window, TextOutput options) for each display component that you need to localize.
To configure localization:
1. Go to Run > Dictionaries -> Localization.
2. Click New.
n The Create New Localization Dictionary window displays.
3. Enter a name for the dictionary.
4. Click OK.
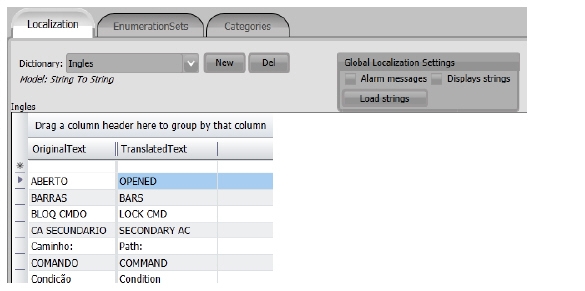
5. Click Load Strings to populate the table with all controls that have strings that are set to Localizable. In the TranslatedText column, enter the text in the dictionary language.
6. Create controls in a display or write a script to use the object called Client.Dictionary to configure the dictionary or dictionary options for the user. When the dictionary changes, the dictionary changes throughout the application.
The alarm messages can also be included in the localization if the related check-box is set.
On Info-Project-Settings, you can also define the default Culture Information that the application is using and the runtime property Client.CultureInfo allows you to change it during runtime.
Some display controls may get the Culture Info directly from the Operating System, so the correct procedure is to have both the Operating System setting and the project settings with the target culture to run the application.
You can also use dictionaries to “translate” tag values to text. For example, a device may have a value of 0 (off) or 1 (on). Rather than display “0” or “1,” you can display the “on” or “off.”
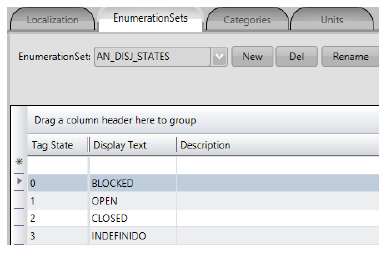
To configure Enumeration sets:
1. Go to Run > Dictionaries > Enumeration Sets.
2. Click New.
n The Create New Dictionary window displays.
3. Enter a name for the dictionary.
4. Click OK.
5. In the Value column, enter the numeric value, and in the Translated Text column, enter the string to display.
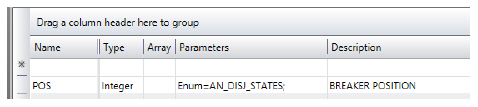
6. For tags that use the numeric values as Enumeration Set, configure the Parameters column to use this set.
7. When configuring a display component to use these tags, set the TextOutput to one of the following:
n Tagname or Tagname.Value show the numeric value of the tag.
n Tagname.ValueAsString or Tagname.DisplayValue show the enumeration string.
See in the figure an example for the creation of the "AN_DISJ_STATES" Enumeration Set to be used for enumerating switch states:
In tag definition see use of Enumeration Set for parameters column:
You can create Categories in order to allow a classification of the engineering object. Most configuration tables, such as Tags, Device Nodes, Alarm Groups, have the Category column, where you can apply one or more categories to that object.
1. Go to Run > Dictionaries -> Categories.
2. Edit the desired categories for this project.
3. Keep adding as many categories as you need.
4. In tabTags -> Objects, for new or existing tags, select the new category in the Category column. Other elements of the project may also use categories for project organization.
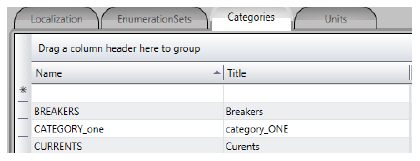
The same tag or object can belong to several categories.
For example, suppose that two categories have been defined: BREAKERS and CURRENTS. We might want to search, within a script code, the tags that are from current measurement points in switch breakers. In the registration of these points we would specify in the Category field of these tags these two categories.
Once the Category created, it will be available in the existing list in Category column of the Object tab, for the creation of Tags. For each tag, choose all that it fits in
The object categories can also be accessed during the runtime for filtering and other custom applications, getting the Category property of the objects. A list of all categories defined in the Project is available during runtime at the property Server.Categories.
You can define engineering units to be used in project, such as measurement tag attributes.
For creation and change of Engineering Units data, this table of Dictionaries is also used.
To configure Engineering Units:
1. Go to Run> Dictionaries> Units.
2. Click New.
n The "Create new unit" window will appear.
3. Please enter a name for this unit.
4. Click OK.
5. In the "Base" column, enter the base unit for this numeric value, and in the "New" column, type the text to be displayed.
On Run part of the engineering workspace there is an Extensions section used for importing and exporting data and parts of projects.
On Import tab, there are several applications that specialize in importing data from other environments or IEDs, so you can include them in this Action.NET project.
In the Export part, you can use filters and options to choose what you want to export and then run the task to create a special .tcomponent file named Component, ready to be imported into another Action.NET project
Under Components, the list of components available on your computer is displayed, which can be checked and imported.
Installed Plugins shows a list of external applications that have been connected to the project.
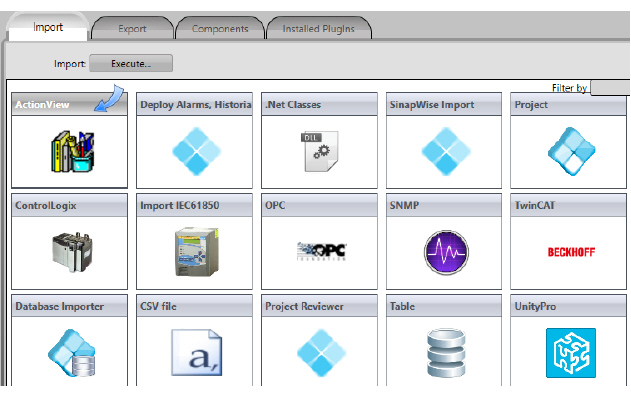
On Run-Extensions-Import tag you will find several wizards to import parts and components from other projects ou data sources.
This contents displayed at that interface are dynamically created according to the DLL found in the IMPORT folder of the project installation.
System Integrators and other partner companies can create import wizards using the Toolkits.
Built-in import tools already installed with regular Action.NET product are listed here.
Allows the import of the data of a project (all), with options of what should be done in case of duplication, for the current project. Alternatively, you can import data from a component file in a project created by the Action.NET export tool described in "Exporting components" on page 85.
Creates the Tag Names, Tag Templates and maps the PLC addresses, all according to the information available in the L5K file.
Import OPC server configuration
Creates the Tag Names, Tag Templates and maps the OPC client addresses, all according to the available information, navigating to the OPC server
When connecting with PI System Historian servers, it automatically creates the link with the PI Tags, elements, and attributes of PI AF servers.
When connecting to PI AF, it automatically brings up the definition of all active models and elements in the selected database, as well as the mapping to communicate with the server.
The PI import wizard is only shown in licensed installations with the PI connection module enabled
Creates the Tag Names, Tag Templates according to the data structure of the XML file, it also creates the Edit-Datasets-Files configuration to read this file
Importing .Net classes from a DLL
Creates Tag Templates that match selected NET dot classes.
This import wizard can be used to import Tags, Alarm Items, Historian tables to Points tables of an ActionView project ( An earlier SCADA software from SPIN Engineering ).
Action.Net Projects Automated generation (Deploy)
This import wizard can be used for the automatic generation of Alarm Items, Historian tables and Points tables. To do this you must create previously Templates, Channels, Nodes and the necessary Historian Tables. Categories should also be created to indicate how templates and Points should be used. The wizard when running does the "blast", i. is creates the tables mentioned. For more details on this wizard see the chapter "Deploy - Generating Automated Projects".
Allows the selective import of tables, with ease of choice of columns in each table, from a data source for which there are available data providers in the environment.
It is a tool that allows you to import data from historical databases of ActionView projects or Action.NET projects. Allows the choice of source bases in MS-SQLServer or other, from event tables, alarms or measurements.
Creates multiple objects in an Action.NET project, from their CSV format definitions in text files. It allows you to create tags, points, channels, devices and create screens and insert graphic symbols on the screens. The file format is the same as that obtained by exporting the project to .CSV.
This tool reads several main tables of objects from an Action.NET project and produces a report of criticisms pointing to relationship integrity defects between objects in the project.
Creates the Tag Names and Tag Templates and maps the addresses to an IEC-61850 client channel, from the mapping of objects within an IEC 61850 IED server.
This importer is part of the ActionWise product. It is used to create tags, points, and screens in Action.NET project from a topological database created by the ActionWiseToolKit application for the purpose of deploying a Self Healing (FLISR) project.
To selectively export parts of an Action.NET project that can be imported into another project, is available this tool, to provide you with the possibilities of selecting data from this project and creating a file with .tcomponent extension.
To do a data export:
1. Go to Run> Extensions> Export, to access the export area;
2. Press the Refresh button to search the current project and populate the table with all existing objects. This list can contain scripts, tags, tables, devices, and any other items previously built in the project
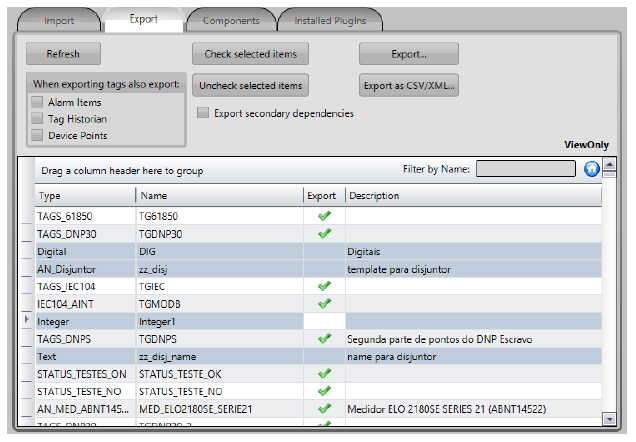
3. Check the rows in the table and select the rows you want to include in the export. Use multiple rows selection, in the conventional way, shift + click the start line and the end line, or ctrl and click each line.
4. After selecting the lines press the Check selected items button, and see that in the Export column the symbol "green marked" will appear.
5. To de-select rows that you do not want to include, repeat the selection and press the Uncheck selected items button, see the "green marked" disappear.
6. Also check if you want the export options for AlarmItems, TagHistorian and DataPoints, which are not included in the export list, because they are always dependent on the tags that are included.
7. Check the Export secondary dependencies option to ensure that other dependencies, if any, are also exported in order to ensure the integrity of the data and relationships
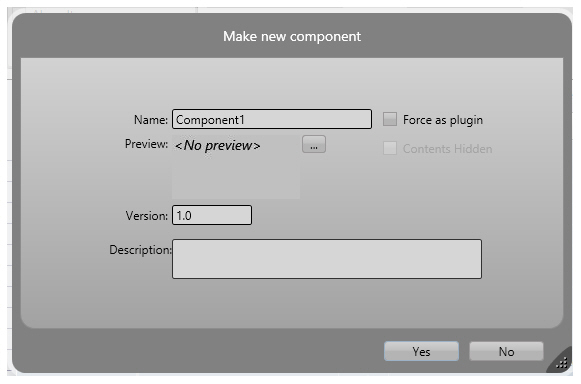
8. To execute the export press Export ... A "Make new Component" window appears, to specify the name of the component and other options. See below figure with this window and information about the existing fields. At the end, click "Yes" to start exporting. A new window appears with the progress of the task and at the end the successful completion notice of the export and the name of the generated file. The generated component file has the same format as the project file itself and is therefore closed for other applications.
9. Alternatively, you can request the export in CSV or XML format, using the Export as CSV / XML button ... The files generated in this way are simpler, in text format, and can be opened and, for example, imported to other designed applications to recognize them.
In the figure is the window used to define a new component:
Name: Fill in the name of the component to be exported.
Force the Plugin: Indicates to what the exporter forces the component to be of type "Plug in" instead of being a standard component.
Contents Hidden: Causes the content of the component to be "hidden", which means that this component to be created can not be edited when it is imported into a new project.
Preview: Enter a preview image that will represent the new component.
Version: Enter the version for this new component.
Description: A brief description of the function of this component as a comment.
On Run-Extensions-Components tab you will find all the information necessary to import a Component into the current project. Once you have a component-type item exported from another Action.NET project, you'll be able to import it into your project.
The figure shows the screen shown in the Components tab.
At the top of the screen are three buttons, and a field for the definition of the subdirectory to be used to display the available components.
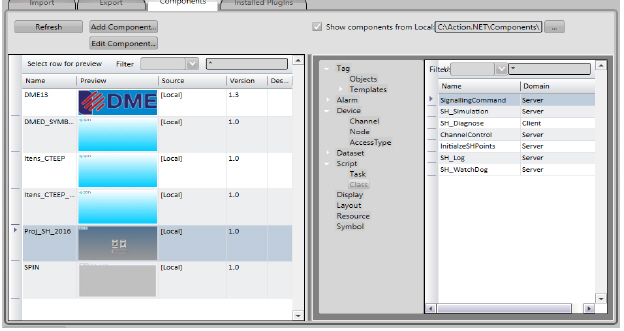
Refresh: Refresh this screen by updating the list with all components that are in the indicated subdirectory and that can be imported into this project. This list can contain any component previously created on this computer or even in the cloud that is accessible (Cloud ). By clicking one of the rows in the list, the left side of the screen, the component is selected, and its items will be shown in the frame to the right of the screen, in the form of a hierarchical list.
Add Component: This button, when pressed, shows the "Add Component" window where you can configure the properties of the component to be imported. This window allows you to select whether the imported component will be of type "Embedded" or whether it will be imported as a manageable "plugin". If the component was created with the option "Force as Plugin", the option "Add as component embedded" can not be selected.
Edit Component: This button allows you to edit the component created previously and available for import. This ease of editing will not be allowed if the component was created with the "contents hidden" option. For editing the component a new instance of the TManager application is launched, with the component to be edited.
The columns in the components list are:
|
Setting |
Description |
|---|---|
|
Name |
The name of the component |
|
Preview |
An image representing the component |
|
Source |
The location of the component, which can be local or in the cloud |
|
Version |
The version of the component as a number (example 1.0) |
|
Product Version |
The version of Action.Net on which the component was created. |
|
PlugInInstalled |
If checked indicates that the plugin is already installed in the project. |
In Run-Extensions-InstalledPlugIns is the information about the plugins previously installed in the project.
At the top of the screen are four buttons:
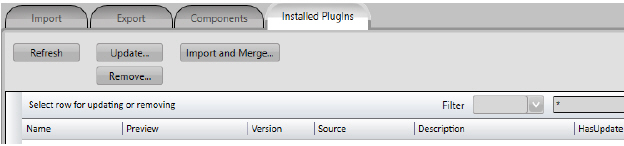
Refresh: Refreshes the list of this screen, updating items that have already been imported as Plugins in the project.
Update: Searches for updates to Plugins, based on the version numbers of the files found.
Remove: Removes a selected Plugin and its project dependencies.
Import and Merge: In cases of Plugins that were not created with the Force as Plugin option, you can do a conversion of the plugin to become a component and add your items to the project.
The columns in Plugins List are:
|
Settings |
Description |
|---|---|
|
Name |
The name of the plugin |
|
Preview |
Uma imagem que representa o plugin |
|
Source |
The location of the plugin, which can be local or in the cloud |
|
Version |
The plugin version as a number (example 1.0) |
|
HasUpdate |
If checked indicates that there are updates for this plugin in the directory indicated as source. |
|
Description |
A brief comment text about plugin function |
You can configure the Action.NET theme and other preferences. The window shown in figure bellow is used for this configuration.
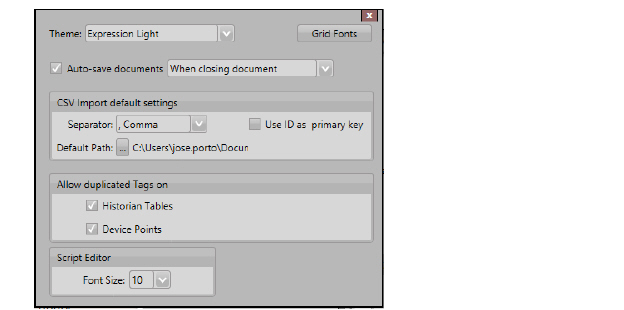
To configure preferences:
1. Click on the Application button (the Blue SPIN Icon on the top of theToolbar).

2. Change or select the options you want.
|
Setting |
Description |
|---|---|
|
Theme |
Select the color scheme that you prefer in the engineering environment. The theme is also useful if you open the same project twice (one to edit and one to view information). You can apply a different theme to each window to distinguish them. |
|
Grid Fonts |
Click to see the fonts available for the user interface. Select the font family, typeface, and size, then click OK. |
|
Auto-save document |
Select how often you want the system to automatically save changes when editing scripts, using the drawing tools, and creating reports. Note: The system saves most changes automatically, regardless of this setting. This setting is only applicable to the functions listed above. |
|
CSV Import default settings |
Allows you to choose the default setting to use when importing files in .CSV format. The separator is defined, if the import is to use the ID as the primary key in the imported tables, and the location where to look for the source file on disk. |
|
Allow to duplicate Tags on |
l Historian Tables—Select to permit the same tag name more than once in the historian tables. You may want duplicate tags with different rates or on different groups. l Device Points—Select to permit the same tag name more than once for device points. You may want duplicate tags for different PLCs or different polling rates or when you have a tag which is feed by a master protocol and also is a source for a slave protocol. |
|
Script Editor
|
l Allow definition of default size font for Scripts Editor |
3. Click close in the upper-right corner.