Welcome to Action.NET
Getting Started
Version an-2016-2 - Last updated March 2019.
The following sections will help you get started with Action.NET:
Action.NET software (Action.NET) is a powerful platform/framework to develop and deliver applications. Action.NET provides a rich, unique, and intuitive user interface, dynamic graphics complemented by a graphic editor, and real-time data acquisition capabilities from an extensive library of industry protocols.
Action.NET’s comprehensive feature set also includes easy information exchange and data access with databases such as Microsoft SQL Server, OSIsoft(tm) PI Systems, Oracle, Sybase, Informix, MySQL and others. The system includes a user-friendly alarm server and event notification module, a logging and reporting module, an advanced historian server, business logic management capabilities, as well as support for local and remote clients, browser based, as well as for the iPad and iPhone.
Action.NET was built from the ground up, without using any legacy code. It is a 100% managed-code application that lets you leverage and take advantage of the full potential of the Microsoft .NET Framework today as well as tomorrow. Action.NET fully supports Software as a Service (SaaS) deployment combined with typical local installations, letting you access and collaborate on development and projects anywhere in the world with just a web browser.
Automation engineers can develop SCADA/HMI (supervisory control and data acquisition/human machine interface) projects that automate a myriad of functions on your factory floor. IT personnel can develop projects that centralize information and send data to portals for management and analysis. In addition, a single project can perform both automation and management functions.
This guide is for users of Action.NET and describes how to install and use the software. You should be familiar with your systems and control needs.
This guide uses the following symbols and typographical conventions.
|
Convention |
Description |
|---|---|
|
Bold |
Words in bold show items to select or click, such as menu items or buttons. |
|
|
Warning contain critical information that may affect your data and system. |
|
|
Tip contains useful information to enhance your application design and productivity. |
|
|
Notes contain important information that may affect how you install or configure your system. |
User Guide and Google Search
The Action.NET User Guide is available on PDF and CHM at the local computer and online using standard HTML pages or using a WEB-only interface with integration with Google Translation. for multi-language support, and direct links to social media.
The entry point to all four Help formats is located at the Info-Help area on the Project Configuration Workspace, and is also accessible clicking on the Help Icon or pressing F1.
All the Help formats support context search. You also do a Google Search on the Spin website, the advantage of the Google Search is that it includes all the on line help files, plus all content on the Spin web site, including the web forums.
At the Info-Help page, on the Project Configuration Workspace, contains an User Interface to enable you to do Google Searches on the Spin Site without leaving Action.NET window.
Online Forum, E-mail and Phone
Registered users have free access to the Online Forum at the Spin site. If you have any difficulties creating your account, send an email to support@spin.com, this email account is also the entry point to open technical support tickets for licensed users.
Licensed users also have access to phone support. Contact us for special agreements (charges may apply) regarding support outside business hours, 24 hours support or on line sessions.
Distributor Support
In many countries and in the USA, Action.NET is sold through formal Distributor partners. A Spin Distributor always has an internal technical staff, trained by Spin, to handle the technical support within its distribution region.
The Distributor has close contact with its customer base, so it is the preferable source of technical information when available within your region.
The Distributor is also certified to perform Action.NET training sessions.
System Integrators and VARs
Spin has a System Integrator and VAR program to fully support companies developing applications and solutions on top of Action.NET platform. The System Integrators and VARs are the primary source to support end-users questions that are specific to the project configurations and solutions created by them.
Following are the system requirements for Action.NET:
n Microsoft .NET Framework v4.6.2
n Operating systems: Any Operating System able to run the Microsoft .NET Framework 4.0 or Virtual Machines compatible with the Microsoft .NET Framework..
l Windows 10, Windows 8,Windows 7, Windows 8, Windows Vista, Windows Server 2008 and Windows Server 2012 all come with Microsoft .Net installed.
l For Windows XP, you must install Microsoft .NET Framework v4.0.
n RAM Minimum requirements: Runtime 1 GB, Engineering 2 GB
n Disk space—150 MB.
n Display resolution:
l For developing applications—Minimum of 1024 x 768.
l For the application runtime—Displays are resolution independent, so you can create applications ranging from small 6" panels up to large high definition monitors.
n For access to web-based installations, Internet Explorer v8 or later.
Action.NET is available as a download from the web site or from a USB. CDs are still available upon request. If you downloaded the Express version for evaluation purpose only, the installation does not require a license key.
The Express version permits up to 75 communication points and two hours of runtime per use and it is only intended for product evaluation and learning; Express versions are not allowed to be sold or applied on projects for production installation.
The fully licensed version has no runtime limitations. For information about purchasing a license, contact your distributor.
If you have Microsoft Internet Information Services (IIS) installed on your computer, you will see a message during installation that the embedded web server could not be installed. All features of Action.NET work without the embedded web server, except for remote access to projects and serving runtime web pages. If you want to use these features, you can configure IIS to work with Action.NET as described at section Installing services on IIS .
Use Windows Update to make sure you have all of the latest critical updates installed.
Some anti-virus, such as Bit-defender, shall be disabled before running the installation.
1. If you are using Windows XP, install Microsoft .NET Framework 4.0.
n If you have Microsoft Office installed, this is typically already installed. If needed, you can install it from http://www.microsoft.com/en-us/download/details.aspx?id=17851.
2. Double-click the installation file.
n The Welcome window displays.
3. Click Next.
n The “Choose setup type” window displays.
4. Select the type of installation you want and click Next:
n Typical—Select for most installations.
n Custom—Select only when you know you need to use specific protocols, and you do not want to install additional protocols. Deselect the protocols you do not need.
n The “License agreement” window displays.
5. Read the license agreement and if you agree to it, click Accept.
n The “Select installation folder” window displays.
6. If you want to install to a different directory from the default, click Browse and navigate to where you want to install.
7. Click Next.
8. Click Install.
n When the installation is complete, click Finish.
n If you purchased a license, you can license your installation. For more information, see Licensing Action.NET. If you did not purchase a license, you can use the Express version for evaluation and learning purposes.
After you install Action.NET, you should have a shortcut on your computer’s desktop and an item on your Start menu.
To start Action.NET:
1. Do one of the following:
n From your computer’s desktop, double-click the Action.NET icon.
n From the Start menu, select All Programs > Spin > Action.NET.
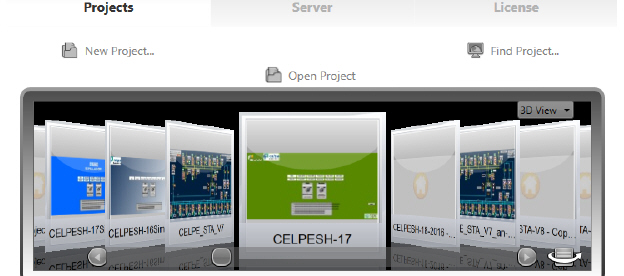
l The main page displays. From this page, you can create, open, and search for projects. The section Managing Projects explain how use the Project selection interface.
If you purchased a license, you can license your installation. After you purchase the license, you must register the license key. If you did not purchase a license, you can use the Express version for training and evaluation.
The license can use a softkey or a hardkey (dongle). You can connect a hardkey to a computer that has already a softkey installed. While the hardkey it is connected, the system uses the hardkey’s license settings.
Use the same procedure as below to update a license for both softkey and hardkey licenses.
For more information about licensing, see Action.NET Versions and Licenses.
To license Action.NET:
1. Make sure that the logged in user has local administrator privileges of the machine.
2. Make sure that at the User Account Control settings the option "Never notify" is selected.
n Go to Control Panel > User Accounts > Change User Account Control settings. In the window that opens, the left side of the bar should be placed in the position below indicating "Never notify." You may need to restart the computer for the notification to take effect.
3. Start Action.NET.
n See Starting Action.NET.
4. From the main Action.NET page, click License.
n Or go to Info > License > Register. when editing a project.
5. If you are using a dongle, connect it to your computer.
6. Click Get Site Code.
7. Navigate to where you want save the file, accept the default file name, and click Save.
8. When the confirmation message displays, click OK.
n Send the file to your distributor or to sales@spin.com.
9. After you receive the license key file via email, place the license key file in a folder on your computer or network.
10. If you are using a dongle, connect it to your computer.
11. Start Action.NET.
12. From the main Action.NET page, click License.
13. Click Load Licensekey.
14. Navigate to the folder with the license key file and select the file.
15. Click Open
16. Verify the License Information, that shall show the serial number and the new license settings.
When installing Action.NET, if IIS was previously installed, you will not be able to install our embedded web server (TWebServer.exe).
The Action.NET software will run without the web server, except by remotely accessing project configurations and serving runtime web pages; all other Action.NET engineering and runtime tools run without needing to install the TWebServer or to do any IIS configuration.
If you want to enable remote engineering access and the web clients using IIS, you need to install some Action.NET services in IIS or enabled the TWebServer embedded web server. Another scenario where IIS is necessary is when you want to run the RUNTIME as a Windows Service, and also to provide remote access to project web pages, iPad displays and project engineering.
In order to enable the TWebServer stop the IIS server or other applications potentially using port 80 and run the product installation. In order to setup the IIS server, follow the procedure in this chapter.
This section is the explanation of how to install those services in IIS. The explanation targets IIS 7.x and 8, but other versions should be similar.
You are going to install three services inside IIS:
n TProjectServer —Allows you to remotely access your project configurations.
n TVisualizerWeb/TVisualizerRemote —Allows remote access to runtime displays.
n iDataPanel—Is the service to provide data to iOS devices.
1. Verify that IIS is installed by going to Control Panel > Administrative Tools and looking for Internet Information Services (IIS) Manager in the list.
2. Enable ASP.Net and .Svc Handlers for the WCF Service.
On IIS 7.x:
If IIS was installed after the installation of the .NET Framework it is necessary to run and verify a procedure as described on http://msdn.microsoft.com/en-us/library/ms752252.aspx which is to run the following programs using the command prompt as Administrator:
n From the Microsoft .Net folder, open the Command Prompt and rung the following commands:
aspnet_regiis.exe –i –enable
ServiceModelReg.exe -r
n Microsoft .Net is installed in one of the following folders:
l C:\Windows\Microsoft.NET\Framework\v4.0.30319 (for 32-bit operating systems)
l C:\Windows\Microsoft.NET\Framework64\v4.0.30319 (for 64-bit operating systems)
For IIS 8.0:
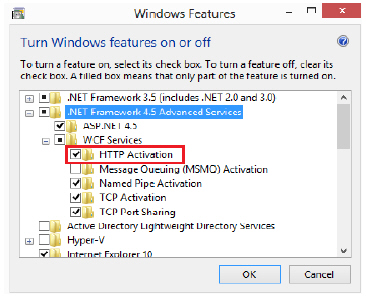
n From the Control Panel, go to Program and Features, then click “Turn Windows features on or off.”
n Enable the ASP.NET 4.5 option. Navigate the tree: Internet Information Services > World Wide Web Services > Application Development Features > ASP.NET 4.5:
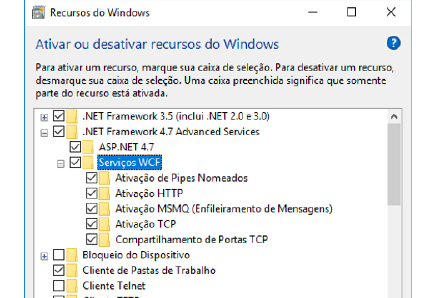
n Enable the HTTP Activation option (under .Net Framework 4.5 Advanced Services).
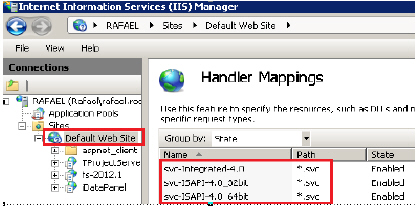
3. From the IIS Manager, verify that the extension .svc is mapped to aspnet_isapi.dll.
n If needed, follow the procedure described on http://msdn.microsoft.com/en-us/library/ms752252.aspx for the version of IIS you are using.
l The .NET Framework installation directory usually is: C:\Windows\Microsoft.NET\Framework\v4.0.30319, or C:\Windows\Microsoft.NET\Framework64\v4.0.30319 (for x64 Windows)
4. From the Action.NET installation folder, run the utility: InstallTWebServer.exe /uninstall, which will remove the default TWebServer installation.

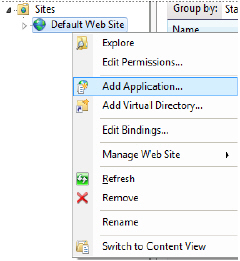
5. From IIS Manager, go to Sites > Default Web Site > Add Application and configure the information for the services as described in following steps
6. For TProjectServer, configure:
n Alias—TProjectServer
n Physical Path—C:\Program Files\Spin\Action.NET (Default folder. Make sure you use the correct path to the Action.NET installation folder.)
n Application Pool—Configure any pool based on .NET 4.0. Example: ASP.NET v4.0
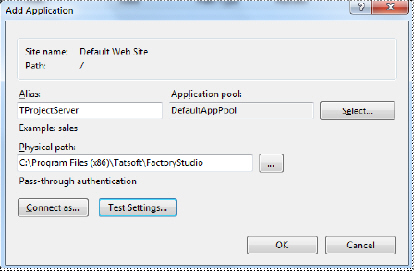
n Note: You should allow “Everyone” access, at least for reading
n From IE, use the URL http://localhost/tprojectserver/service.svc to verify if the service was correctly installed. That should show a page with information about the service.
7. For TVisualizerWeb/TVisualizerRemote, configure:
n Alias—an-2014.1
n Physical Path—C:\Program Files\Spin\Action.NET\an-2016.2 (Default folder. Make sure you use the correct path to the Action.NET installation folder.)
n Application Pool—Configure any pool based on .NET 4.0. Example: ASP.NET v4.0
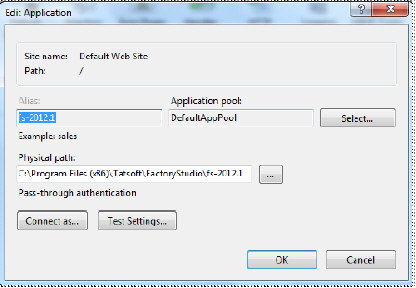
n Note: Security should enable any user (Everyone), at least for reading.
n On IE, test the URL http://localhost/an-2014.1/service.svc to verify the service was correctly installed. It should show a page with information about the service.
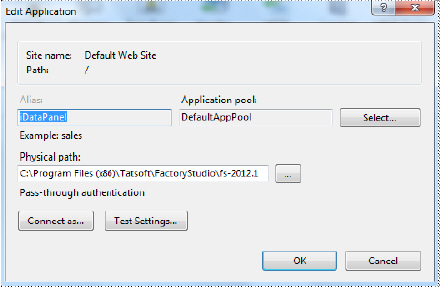
8. For iDataPanel Service, configure:
n Alias—iDataPanel
n Physical Path—C:\Program Files\Spin\Action.NET\an-2014.1 (Default folder. Make sure you use the correct path to the Action.NET installation folder.)
n Application Pool—Configure any pool based on .NET 4.0. Example: ASP.NET v4.0
n Note: Security should enable any user (Everyone), at least for reading.
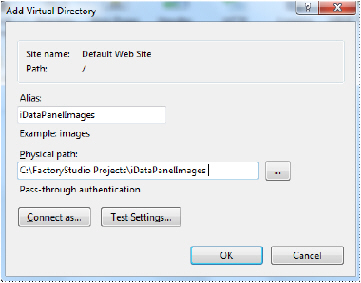
9. For DataPanelImages (Virtual Directory), configure:
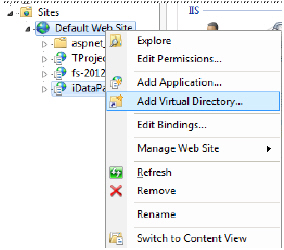
n Alias—iDataPanelImages
n Physical Path—C:\Action.NET Projects\iDataPanelImages
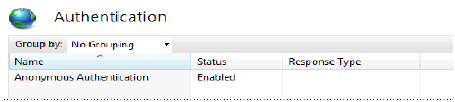
10. Enable Anonymous Authentication for each of the services.
11. Setup the Compression module. If it is not installed, you will see the alert boxes.
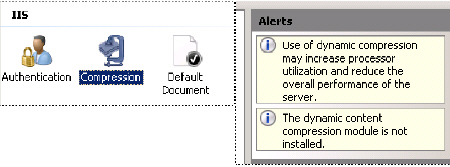
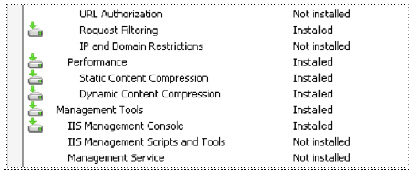
If it's not installed, go to the Server Manager, Roles, Web Server. Under Role Services, check your installed Roles. If Dynamic Compression isn't installed, click Add Roles and install it.
You can go back to compression for your site and ensure Dynamic Compression is checked. At this point, Dynamic Compression should be setup, but you really need to be specific about what mimeTypes will be compressed.
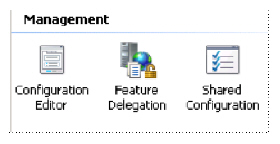 Back in IIS Manager, go to the page for the SERVER (not the SITE) and Click on Configuration Editor:
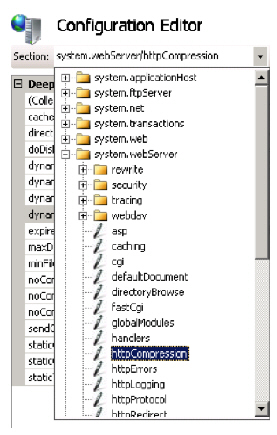
From the dropdown, select system.webServer/ webdev / httpCompression:
Then click on Dynamic Types and now that you're in the list editor. Add application/json as seen below.
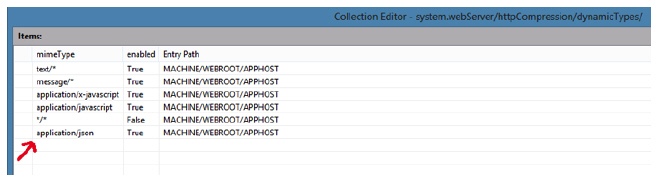
After you've added them and closed the dialog.
12. If your remote users cannot access the Action.NET, you should allow Everyone access to the Action.NET folder, at least for reading. Right-click the folder, click the Security tab, click Edit, then add read permissions for Everyone.

IIS must be restarted after configuring the services.
 Warning
 Tip
Tip Note
Note