
Configuring Historian Tables
The Historian module performs automated data logging to SQL databases, and others. You can also use the Datasets module to store data in SQL, but the Historian module has a simplified configuration, with the database tables automatically created and a built-in connection with the trend charts.
The system can also use the information on the historian on the .NET scripting, get past values on tags or graphic displays or export the data.
The following sections describe how to configure data logging:
n Configuring Historian Tables.
n Adding Tags for Data Logging.
n Customizing Getting Samples.
You can select any SQL database, such as Microsoft SQL Server, Oracle, MySQL or any OLEDB or ODBC compliant database to store the data. By default, Action.NET uses an embedded SQL database SQLLite. For information on how to select the historian database, see Historian Database Provider.
When using OSIsoft(tm) PI System, there is no need to do any Historian configuration to access the data stored in the PI System, see Using OSIsoft(tm) PI System.
By default, the tag historian database has one table configured. The table settings control when tag values are written to the historian and how long the values stay in the historian. If you want some tags to have different settings, you should configure additional tables with the settings you need and assign tags to the appropriate table.
The table configuration is independent of the Database selected to store the information, as described in Historian Database Provider.
If you want some tags to have different settings, such as the logging interval, you should configure additional tables with the settings you need and assign tags to the appropriate table. You can also edit the settings of the default table.
In general, do not store more data than you need. Storing a large amount of data slows the recovery of that data. You should use triggers and deadbands that are as large as possible, to ensure you have the information you need, without overloading the system.
To configure a historian table:
1. Go to Edit > Tags > Historian.
2. Do one of the following:
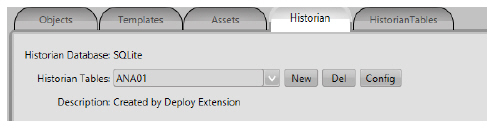
n To edit an existing table, select it from the Historian Tables drop-down list and click Config.
n To create a new table click New.
n Will be shown a window to fill up the table columns.
3. Alternatively, you can go direct to Edit>Tgas>Historian Tables and fill up columns data.
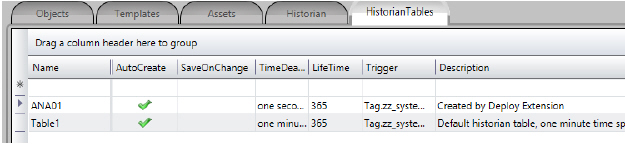
4. Enter or select information, as needed.
|
Option |
Description |
|---|---|
|
Name |
Enter a name for table in the database. |
|
Auto Create |
Select to have the system automatically create the table in the database. |
|
Save on Change |
Select to store data in the table (add a row) every time a tag associated with the table changes. |
|
Trigger |
Use to store data in the table every time a tag or tag property changes. When used with the Save on Change option, the system stores data in the table when either the tag value changes or the Trigger value changes. |
|
Time Deadband (Log TimeSpan) |
Enter the minimum logging interval, that is, how long the system must wait after storing the value of a tag before storing a new value. Use with the Save on Change option to avoid creating too many records in the database. |
|
Life Time |
Number of days to retain the historian data. After that time, the older rows are automatically deleted from the database. To never delete data, leave this field blank or enter 0 (zero). |
|
SaveQuality |
This option must be checked so that when recording a sample in the history, it is included besides the value of the tag also the quality |
|
GetSampleMethod |
The name of a script method that will be called to customize the data before its writing in the history, if necessary. See Customizing Getting Samples |
After you configure your tables for the tag historian, you can configure the tags for the historian.
On Edit>Tags>Historian are the definitions for Historian Tables.
On the upper right hand side of the tab is the name of the used Database Manager. In the figure shown below is SQLite;
To configure the tags for the tag historian:
1. Go to Edit > Tags > Historian.
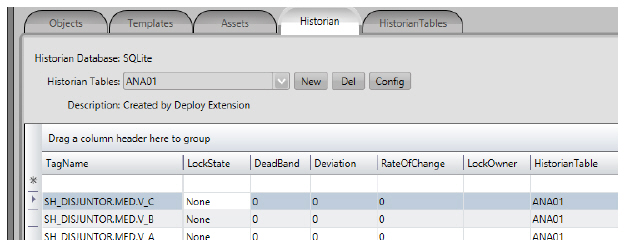
2. Click the Historian Tables drop-down list and select the table in which you want to add tags.
3. Start by filling in the columns of the table with the chosen tags
n You can copy and paste tags from the Objects tab.
4. Enter or select information, as needed.
|
Column |
Description |
|---|---|
|
Name |
Enter a tag name or click ... to select a tag. |
|
DeadBand |
When using the Save on Change option in the historian table, the DeadBand is how much the value must change (in EngUnits) for the system to store the value in the historian. |
|
Deviation |
When using the Time DeadBand option in the historian table, the Deviation is how much the value must change (in EngUnits) for the system to store the value in the historian. This value overrides the Time Deadband logging interval. |
|
RateOfChange |
When using the Time DeadBand option in the historian table, the RateOfChange is how much the value must change (in EngUnits) by second, for the system to store the value in the historian. This value overrides the Time Deadband logging interval |
|
HistorianTable |
Select the table that has the settings you want to use for when to save and how long to retain this tag’s value. |
5. Continue adding as many tags as you need.
The database used to store the Tag Historian is defined in Edit > Datasets > DBs by the database connection object named TagHistorian.
By default, when a new project is created, the TagHistorian is defined to use the built-in embedded SQLLite database.

The SQLite database should be used for small to medium databases. If the number of tags and periodicity of saves require greater robustness and mainly multi-disk distribution and client / server management characteristics, you must define another SQL database system for the Historian. To define another database for the Historian, you just need to create a new database connection, as explained in Configuring Database Connections, and name it TagHistorian.

The system does not allow duplicated names, so to create a DB connection with name TagHistorian you must rename or delete the existing row using that name.
The system can seamlessly use the OSIsoft PI System as the historian provider. In this scenario it is not necessary to do any Historian configuration at all. If the tag is mapped to a OSIsoft PI point, the system will automatically call the PI Server to get data when plotting trend charts or any script or display methods requiring historian information.
The system can work with both the PI System and our the built-in Historian at the same time, when historical information is requested to a point, either from trend charts or scripts, the system will look for that information on the built-in Historian module and, if not available, it will try to find that data on the PI server.
For information on connection to PI Systems, see Projects Import and Exports
The historian tables contain the following columns:
n UTCTimeStamp_Ticks—Date and time in Universal Time for that row in 64-bit .NET ticks. The value of this property is the number of 100-nanosecond (1/10th of a millisecond) intervals that have elapsed since 12:00 A.M., January 1, 0001. This is a new date/time standard used by the Microsoft .NET framework.
n LogType—Auxiliary column to show when the row was inserted: 0=on startup, 1=normal logging, 2=on shutdown.
n TagName—Column automatically created using the name of tag as the column title. It stores the data value using double precision.
n _TagName_Q—Column automatically created for the quality of the data, using the OPC quality specification.
Typically you can associate up to 200 tags with each historian table, but that number is dependent on how many columns your target Database allows. The tags should be defined in the same table when they have similar storing rates and process dynamic, as you need to save one tag in the table, you need to save the entire row.
In order to visualize trend charts with historical information, you can use the built-in trend object on the displays or reports. See section Configuring the Trend Window for more information.
The trend chart object calls the Historian server to get the data to plot the charts. In some scenarios, you may want to override that configuration and define a .NET code to provide the values. This is used, for instance, to plot recipe calculated data, future data, data from other SQL tables or any custom scenario.
The custom GetSamples method should be defined at any Script Class and on Edit-Tags-Historian that method must be defined at the column GetSamplesMethod.
The prototype of the method is:
DataTable GetSamples(string[] tagNames, object startRange, object endRange)
The parameters:
n StartRange and EndRange are of type
l dot Net DateTimeOffset, when using time/date measurements
l the Range are double variables, When getting date to X-Y charts,
n The Returned DataTable shall have the columns:
l DateTime: Date time of the sample
l TagName: The name of tag is used as FieldName to the column with Double values of the tag
l _TagName_Q: Optional column with the quality of the data
The Historian namespace has the properties and current of the Historian server.
The Historian.Table object has the list of Historian tables defined and its properties.
The following tag property, if there is the data logging, is enabled to the tags.
Tag.tagname.Historian