
When you are using the code editor, the system constantly compiles the code in the background. You can also build the whole project, as needed. For more information, see “Chapter 16, Running the Application” on page 215.

As with most SCADA software, the functionality of allowing the user to write computer programs or scripts while creating a supervisory project is also available in Action.NET.
These programming codes, which will be embedded in the system, make it possible to particularize or create behaviors and actions on objects (tags, screens, reports) that are not natively present in the system.
The following sections describe how to create scripts:
n Working with the Code Editor
When you are using the code editor, the system constantly compiles the code in the background. You can also build the whole project, as needed. For more information, see “Chapter 16, Running the Application” on page 215.
Two .Net libraries are available for use with Action.NET:
n The internal scripting has built-in methods that you can call using TK.<methodName>. For more information about these methods, see the Toolkits.pdf.
n If you use Microsoft Visual Studio, a library is available for use with Action.NET. For more information about this library, see the Toolkits.pdf.
Tasks are code, written in either VB.Net or CSharp, that execute based on process events, either when the trigger event occurs or at every interval defined in the Period column.
Action.NET comes with the following built-in tasks:
n ServerStartup—Executed when the project starts running. Runs on the server (computer running TServer.exe).
n ServerShutdown—Executed when the project shuts down. Runs on the server.
n ClientStartup—Executed on each client when the TVisualizer.exe (Displays module) starts running.
n ClientShutdown—Executed on each client when the Display module closes.
To configure tasks:
1. Go to Edit > Scripts > Tasks.
2. Enter or select information, as needed.
|
Column |
Description |
|---|---|
|
Name |
Enter a name for the task. The system lets you know if the name is not valid. |
|
Code |
Read-only. This defaults to the language selected when you created the project. From the Code Editor tab, you can change the code language. To change the project default, go to Info > Settings. |
|
Trigger |
Enter or select the event (tag or object) that triggers the task execution. The task executes when the value of the object changes. |
|
Period |
Enter how often the task should execute. |
|
Domain |
Select where the script executes: l Client—Task executes on each client system. These are tasks that apply locally (on the user’s computer), for example, report generation. l Server—Task executes on the server system. These are tasks that apply across the application, that is, globally. |
|
InitialState |
Select the tasks’s initial state: l Enable—Task is ready to run. l Disabled—Task is not ready to run. Lets you enable the task under specific conditions. |
|
BuildStatus |
Read-only. Status of the task code from the continuous compiling process. l Green check mark—Task runs without errors. l Red X—Task has warnings or errors. Double-click to go to the warning or error. Warnings are information only. Errors will prevent the code from running, but only that specific task. The rest of the application will run. |
|
BuildErrors |
Read-only. Displays any errors encountered during the last build. |
|
EditSecurity |
Lets you choose the security level for editing the code of this Task. Clicking will bring up the window with the categories of users that will have access to change this TASK. |
|
Description |
Enter a description of this task. |
3. Enter the code for the task.
4. Double-click the row to access the Code Editor tab. See Working with the Code Editor.
5. Click Save.
Classes let you create a repository of class libraries, methods, and functions that you can use across the application. You can call them from tasks, other classes, and displays (code behind).
Action.NET comes with the following built-in classes:
n ServerMain—Methods library available for all server tasks.
n ClientMain—Methods library available for all clients.
To configure classes:
1. Go to Edit > Scripts > Classes.
2. Enter or select information, as needed.
|
Column |
Description |
|---|---|
|
Name |
Enter a name for the class. The system lets you know if the name is not valid. |
|
Code |
Read-only. This defaults to the language selected when you created the project. From the Code Editor tab, you can change the code language. To change the project default, go to Info > Settings. |
|
Domain |
Select where the class executes: l Client—Class executes on each client system. These are Classes that apply locally (on the user’s computer), for example, report generation. l Server—Class executes on the server system. These are classes that apply across the application, that is, globally. |
|
BuildStatus |
Read-only. Status of the class code from constant compiling process. l Green check mark—Class runs without errors. l Red X—Class has warnings or errors. Double-click to go to the warning or error. Warnings are information only. Errors will prevent the code from running, but only that specific class. The rest of the application will run. |
|
BuildErrors |
Read-only. Displays any errors encountered during the last build. |
|
EditSecurity |
Lets you choose the security level for editing the code of this Task. Clicking will bring up the window with the categories of users that will have access to change this TASK. |
|
Description |
Enter a description of this class. |
3. Enter the code for the class.
n Double-click the row to access the Code Editor tab. See Working with the Code Editor.
4. Click Save.
You can write code in either standard VB.Net or CSharp. You can also switch between the two. If you change your language selection in the code editor, the system automatically converts existing code to the selected language.
If you need references to your own assemblies, you can use Run > Build > References.
As a fully compliant .NET application, you can find free source code to use, including .NET components, products, and libraries, plus your own libraries that you can use right away.
Action.NET does expose many .NET libraries to the application, but there are few methods that are very frequently required, such as type conversion or copying tags to DataTables or .NET objects, or dynamically changing the communication settings. Those methods are included in a library toolkit. To use those methods, you just need to put TK. in the code editor.
Example:
double x = TK.ConvertTo<double>("123");
The methods available are described in Toolkits.pdf.
To edit code:
1. Go to Edit > Scripts > CodeEditor.
2. From the drop-down list in the main toolbar, select the task or class you want to edit.
n To create a new task or class, see Configuring Tasks or Configuring Classes.
3. If needed, from the code editor toolbar, select a different code language.
4. Click Save.
Besides the Edit > Script > Expressions table, in several places in Action.NET, you can use expressions, using the same syntax described here, to determine a value or to configure a condition.
Expressions are just plain VB.NET expressions, such as arithmetic expressions or calls to script.class methods from the project. Intellisense only shows tags and application objects, but the expressions are compiled using the standard VB.Net compiler, so what you would write in the code editor, should be accepted in expressions as well.
Action.NET implements some automated replacements, such as == to =, so the syntax of an expression is also very close the a C# statement, but with no need to add the “;” on the end.
In this way, both VB.NET and C# programmers are able to use seamless the expression fields.
In expressions, you do not need to put @ before that tag names. You need the @ in the code editor to differentiate project tags from .NET variables. However, expressions do not have local .NET variables, so you use the project object directly.
For arithmetic operands, you can use the standard operands as described in the .NET documentation.
To allow single-line evaluations, the .NET language has the IIF command, which currently is used only with IF. The IF command has three parameters. For example:
IF (A, B, C)
The first parameter is a condition. That method will return B if condition A is true, and it returns C if the condition is false.
Example: If (tag.A = 1, "True", "False") will return a string according the value of tag.A.
In this .NET method, all three parameters are evaluated independent of the condition. For instance, if you have IF (tag.A = 1, script.class.client.Func1(), script.class.client.Func2()), both Func1 and Func2 will always be executed. Only the return value will be different based on the value of tag.A.
The IF or IIF method needs to evaluate the parameters before calling the method. There are many scenarios where you want to execute only the function according the value.
For that scenario Action.NET has a method called TIF, which has that behavior.
So, you use the expression:
TIF (tag.A = 1, script.class.client.Func1(), script.class.client.Func2())
Only the Func1() or Func2() will be executed, according the value of Tag.A
The TIF method is defined in the class library that is automatically exposed for expressions that are in the toolkit function library.
For more complex calculations, you can call a class that you create on the Classes tab. See Configuring Classes.
To configure expressions:
1. Go to Edit > Scripts > Expressions.
2. Enter or select information, as needed.
|
Column |
Description |
|---|---|
|
Object |
Select an existing tag or object. |
|
Expression |
Enter the expression. The expression can be basic mathematical expression, use a class, or a conditional expression. |
|
Domain |
Select where the expression executes: l Client—Expression executes on each client system. These are expressions that apply locally (on the user’s computer), for example, report generation. l Server—Expression executes on the server system. These are expressions that apply across the application, that is, globally. |
|
Execution |
Select when the expression executes: l OnChange—The expression executes when the value of any tag in the expression changes. l TriggerOrPeriod—The expression executes when the trigger event occurs or when the interval set in the Period elapses. l ChangeOrStartup—The expression executes when the value of any tag in the expression changes or at startup. |
|
Trigger |
Enter or select the tag or object that triggers the expression execution. The expression executes when the value of the object changes. |
|
DisableCondition |
Enter or select the tag or object that disables the expression execution. |
|
BuildStatus |
Read-only. Set after you click Verify. l Green check mark—Expression runs without errors. l Red X—Expression has errors. |
|
BuildErrors |
Read-only. Displays any errors encountered during the last build. |
3. Click Verify to check the validity of the expression.
Action.NET has an integrated .NET code debugger. In order to use it, it is necessary that the local computer has cache files with the necessary files to run the debugger.
The steps to enable the debugger are:
1. Enable the Debug Information on Run > Build > Messages
2. As necessary, save the source code you want to debug again, so the debug information is created. This step is only necessary the first time you open the project on the computer, as after that, the background compiling will keep generating the necessary debugging information to enable the use of breakpoints and step execution.
In oder to have a .NET debugging session, the engineering environment must be connected with the runtime and the .NET debugger attached to server or client process.
Follow these steps.
1. When Running the project, either on Run > Test or Run > Startup enable the connect check box.
2. If the project is already running, you can go to Run >Test or Run > Startup, according the runtime you want to attach, and connect to the runtime system, pressing the connect button on those pages.
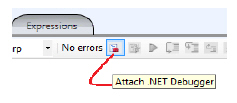
3. Open any script that has debugging information and press the Attach .NET debugger button. A message on the bottom of the engineering workspace will show that a debugging session is active with the server components or the client components of the running project.
4. When the .NET debugger is attached the system will stop on the defined breakpoints and it will also stop automatically when any .NET Exception occurs
See the Code Editor for the Attach and Detach debugger buttons, run, run step by step create breakpoints shown in the red rectangle. At the bottom debug status information.
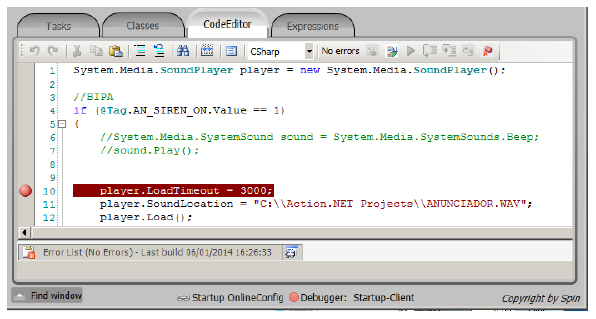
In order to setup a breakpoint, open the desired code, select the line and press the Insert Breakpoint at the toolbar.
When the system stops on a breakpoint you can perform step by step execution or hit the continue button.
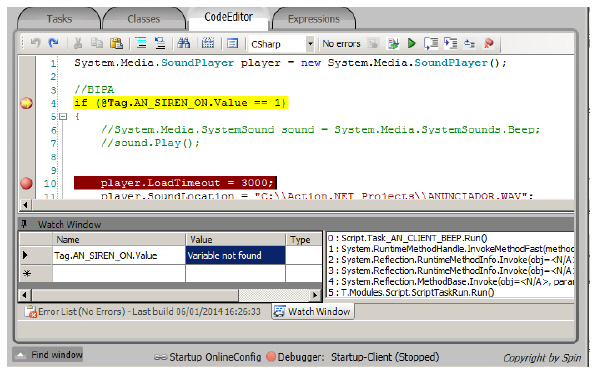
In order to inspect local .NET variables, tags or project objects, you can select the text in the script editor and, when the execution is stopped on a breakpoint, the toolkit will show the current value of the variable.
You can also add .NET variables or project objects to the Watch window. When adding tags or project objects, you need to use the @ symbols, example @tag.tag1, so the system knows it is a project object, not a local .NET variable. Keep in mind the Watch display is only updated when the execution is stopped. If you want to have real-time values for tags and objects you can open the PropertyWatch diagnostics tool.
The namespace Script is the entry point to all objects related to the Scripts module.
The Script.Task object lists all configured database connections and their runtime properties.
The Script.Class object lists all configured tables and its runtime properties.
See http://www.spinengenharia.com.br/help/an-2016/runtime/index.html for the complete programming reference on runtime objects.
